Welcome to first installment of not-meeting-related BMCC blogs. Some of these will be very basic. Some, quite advanced. Today’s is fairly basic, like me. If you consider yourself to be an expert in mounting and framing your prints, you might have a good laugh at my expense. But if you, like me, have viewed mounting and framing as being a challenge to overcome, this post may provide some confidence or some strategies.
Let me start by telling you to print your work if you’re not already (I know there’s a handful of you out there). There is definitely something special about seeing your work in print, especially larger prints. In a world where everything viewed on a digital screen, usually a screen smaller than most of us print, seeing your own work in a large print will certainly leave an impression. It feels somehow more “official”. Also, most of us have at least some prints hanging in our homes. Looking for gift ideas this holiday season? Prints. Try it if you haven’t.
If you’ve printed, but not for our competitions, I’ll guess that the main thing holding you back is FMS (Fear of Mounting Syndrome). This season I have challenged myself to get over my own case of FMS. “But John,” I hear some of you say, “haven’t you always entered mounted prints into our competitions?” That is technically true, but I never mounted any of them until this year. At Walmart, you can make board prints. The photo is printed right on the board and it doesn’t really cost all that much extra to do. The setback is that you are limited in what sizes are available to you.
The main people people hesitate to mount their own prints is due to the idea that if you mess up, you just wasted a print. Depending on which method you use though, that doesn’t have to be true. I’ve heard from lots of people that double-sided tape and transparent mounting corners work quite well and are fixable if you mess up. I haven’t used either of those methods, as I prefer the idea of a more permanent bond.
 |
| Do NOT use Mod Podge when pressed for time |
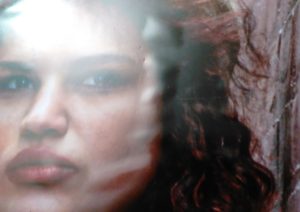
My first experiences with mounting prints was with what’s known as Mod Podge. It’s a glue/sealant with many uses. One use is to mount photos. Do NOT, I repeat, do NOT use it for that intended purpose. It is way too easy to use too much and cause your mounting board to warp over time. You’ll probably also get some of the glue on your print and have to clean it off (which, fortunately, is actually fairly easy to do). Also, it is almost impossible to not have bubbles appear in your print. The picture I’ve used here is an extreme example, but you get the point. Speaking of points, you’ll get told to poke the bubbles with needles! Ummm… This might work. It probably does. But if you worried that you’d ruin your image by mounting it, how much more will you worry about sticking needles into it? The Mod Podge method only has two good points, as far as I’m concerned: First, it does make your print stick to the mounting board. Second, if you mess up the placement of the print on the board, it is actually quite easy to readjust before it dries.
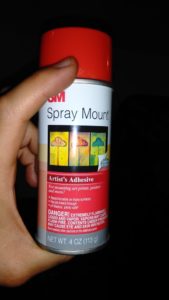
 After many mishaps with Mod Podge, I’ve started using spray adhesive. No bubbles. No warping. It’s permanent. $8 for a can at Michael’s ($4 with their frequent 50% off sales) and it will easily last you the season. The only bad thing I have to say about this stuff is that it’s difficult to move things once their placed (which is kind of the point, isn’t it?). My process is pretty simple:
- Spray a thin coating on the back of the photo.
- Place the photo down on a piece of mounting board that’s a little larger than the photo.
- Cut the board to size. I use a metal yard stick and a box cutter to size the board exactly to match the print, but it’s just as easy to leave a border.
Framing is where more people get cold feet. Well, time to put those wool socks on and make your toes toasty! Seriously though, merino wool. It’s like walking on a carpet that’s attached to your feet.
Side Note: Michael’s has sales going on most the time where you can get 50% off nearly all the time. I recently got frames at 70% off with some other sales going on. D-Rings and hanging wire can be purchased there as well. Also, sometimes there are good frames to be had in the picture bin at Goodwill.
Getting your print into the frame, I think, is the step that most people have no issue with. If you’ve mounted your print, just stick it in. But if you’re not sure of mounting yet, you don’t actually need to in order to frame it. Just put the print in with a backing board behind it. Whether or not it’s mounted will make little difference.
Hanging your frame though, worries some people, especially when asked to hold to specific criteria as we are for the museum display. D-rings, attached to the frame so the wire is tight and it hangs 3 inches below the top of the frame? The first time I brought frames in for the display, I was worried about if my wire was going to be too loose or if it was going to hang at 2 inches or maybe 4; would it be rejected for not conforming? I realize now I had no reason to be concerned. It’s not meant to be a rigid regulation, but rather only a guideline to help us have a consistent look. Almost everyone has initial concerns about whether something is going to be “wrong” with their submission and usually we find out we had nothing to worry about.
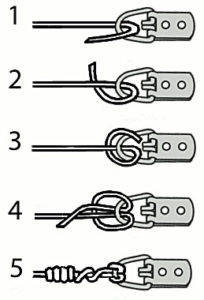
 I was also concerned about how to wire the wire… Knot the wire? Bleh. I was concerned that my wire would loosen up and cause my frame to come crashing down into the floor. Again, I found out later that I had little reason to worry. See this picture of the “lark’s knot”? I just found out I’ve been doing my wire wrong. I’ve been skipping steps 3 and 4 this whole time! I don’t have a knot. I wrap the wire nice and tight around itself. As I pull it tighter, I notice that it more or less grips itself (thanks to the insulation on the wire). A small amount of duct tape wrapped over the tip of the wire not only prevents it from scratching the back of the frame, but also keeps it from unraveling.
Your D-Rings don’t actually have to be D-Rings. Those are expensive little bast– Umm… Anyway, if you do get D-Rings at Michael’s, they’ll come with screws. Most of these do not need pre-drilling or anything. Just screw them in. When in doubt though, there’s usually people willing to help out on the day the prints are brought in.
I hope my bloopers here and there are able to build someone’s confidence so that they may feel free to make bloopers of their own. It’s definitely a learning experience, but well worth it. If you haven’t been printing/mounting/framing, I encourage you to try. January 2nd is not only the deadline for our first General theme of the year, but it is also the day to bring in Mirror shots for the January museum display! Anyone who won in the Fall NECCC competition, you are encouraged to bring those prints as well!