“What can you capture in-camera? No Photoshop. No post-processing. Just you and your camera. Exposure, white balance, cropping, etc… Let’s try to get it right in-the-camera.”
The above is a quote from the over-the-summer description for Out-of-Camera. In the following post, I’ll go into more detail on the rules/restrictions of this theme, hopefully clearing up some questions that have come out of it. Two observations first:
- Yes, we are aware that this would be an easy theme to cheat. Simply process your photo with a realistic rendering and say you didn’t process it at all. Easy peasy. But most of us are more interested in growing as photographers, rather than simply winning a ribbon. The intent of this competition is to get to know your camera better, maybe even browse through the manual, and become more a bit more confident using it. If someone wants a ribbon so badly that they feel compelled to cheat to get it, then it’s their loss more than ours.
- Edited images are often better than ones taken straight from the camera. That is, I would hope, the reason why a person would normally edit their image; to make it better. But one goal of the photographer (not just in this competition, but all the time) should be to start out with an image that is as close to the desired end result as possible, straight from the camera. Why spend hours healing dust spots at the computer, when keeping a clean sensor can prevent it? Yes, you can clone out that person in Photoshop, but why not just wait until the person passes behind a tree? You can change composition by cropping in later, but doing so reduces the resolution of your image, so why not compose in camera?
Breaking Down an Image
I find a great sense of irony that the photo at the top of this page is heavily edited and would not be allowed by the theme. Let’s take a look at the before and after, the alterations I made, and what (if anything) I could have done to avoid needing to edit on the computer.
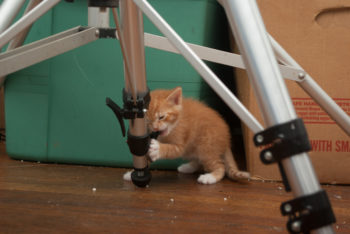
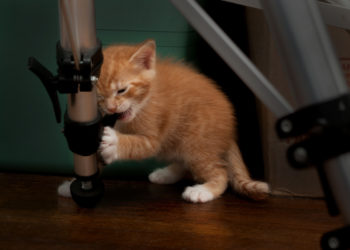
To get to the After image:
- Cropped in closer to remove distractions, but I could have moved in closer.
- Healed the debris of the floor, but I could have swept more frequently.
- Darkened the floor and enhanced the cat’s reflection, but I could have mopped.
- Reduced saturation of the background, added a vignette, and reduced brightness of the foreground tripod leg to put more emphasis on the cat, but… Hmm… This is tricky. I know the vignette can be created by using a larger lens hood, but otherwise, I may have had to do without the other effects.
And Another
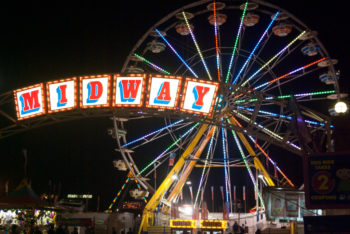
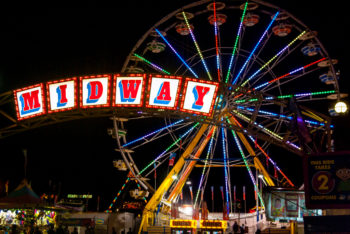
In 2011, I was on the midway at the Big E one night and wanted to see how my (then) new camera would perform handheld at high ISO (6400). Not bad overall. A little noise in the sky. For the After image, I reduced the noise, increased contrast and saturation, and popped up the clarity just a tad. But I ask you, was the Before image actually bad? Did it actually need processing?
Do’s and Don’ts For This Theme
- Do crop your photo to get the ratio you want to print at and resize to meet the size requirements for digital I’m sure none of us have a camera that takes 1024×768 images). Don’t crop to fix a composition you’re not happy with.
- Do use exposure compensation (or manual mode) to adjust your exposure while taking your photo. Don’t change exposure, contrast, saturation, and other settings in post.
- Do clean up the scene ahead of time or compose to avoid distractions. Don’t use cloning/healing.
- Do come up with your own special effects you can do yourself… Zooming during a shot, creative use of flash, panning, etc… Don’t use special effects/filters that get added to a photo.
- Do use the Straight Out Of Camera (SOOC) flickr group as a reference point, not only for what is typically accepted as out-of-camera, but also to see get ideas. (Keep in mind that they are a bit stricter on their definition, as they allow any programs at all to be used, but we have to in order to scale our images down to the maximum of 1024×768 for digital)
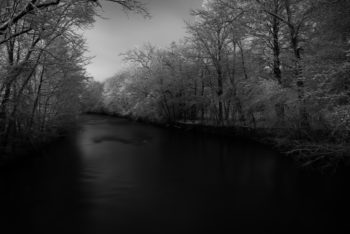
A Word on Black & White
The monochrome category of our competitions is a bit trickier a beast for this theme. Most of our cameras have a black & white setting to automatically take photos in monochrome. Some cameras save a b&w jpg, but keep the raw as color. Other cameras actually make a b&w raw file. A handful of cameras cannot do b&w, except as processing you do after the fact.
In film days, photographers would use different colored filters to get the photo as they wanted. If doing a landscape, you might use a red filter, which would make the sky dark and allow the clouds to stand out better. If doing a portrait, an orange filter might be used to reduce the appearances of blemishes on skin. Interesting stuff, really, but many of us do not have colored filters in our camera bags anymore. Today’s equivalent would be the presets available in many cameras and in programs like Lightroom and Photoshop. My camera has Portrait (orange filter) and Scenic Landscape (red filter) as options. I’m pretty sure Urban Scene is in there as well.
Using a camera preset for b&w would clearly be acceptable. It’s being done before the shot and the preset is not really a special effect to “add to” the photo, so much as it is a way to allow the photographer to tell the camera their intent of how the light should be handled.
But what about the presets that are applied to a raw file after the photo has been taken? After all, not all computers can make a b&w image unless you do it after the fact. I don’t think there can be a 100% foolproof answer here (the SOOC flickr group mentioned earlier doesn’t even allow for b&w because of this), but I think I have a two part answer that might be close enough for the sake of the competition:
- Presets that turn a color file into a b&w after the fact can be allowed, as long as the photographer’s camera has no way of applying the preset ahead of time. Also, the photographer shouldn’t be changing a bunch of sliders trying to adjust things until they look right on screen. Choose a preset and be done with it.
- As we don’t have very many photographers who do shoot monochrome, it should be easy for them to come to an agreement as to what they think should be allowed for b&w. At our meeting on Tuesday (10/16), it’s still a full three weeks before the deadline, so they could talk before or after the judging portion of our meeting to make sure they are on the same page.
Upcoming Photo Opportunities
I hope this post has been helpful in figuring out what is allowed/prohibited for this theme. If not, feel free to ask. In the meantime, here are some nearby photo opportunities taking place soon:
- Pumpkin Fest at Whitney’s Farm – October 19-21. I’ve got just two words for you; “Petting zoo”.
- Zombie Pub Crawl – October 20th. It’s like trick-or-treating for adults, but with beer instead of candy. And you have to pay for what you drink. If you choose to be a zombie (or a survivor), the make-up station starts up at 5pm. If you drink, make sure to use optical stabilization. Word of warning if you go as a zombie though: “If your makeup is so awesome that it doesn’t look like you the bartender has the right to not serve you.”
- Halloween Dog Parade – October 27 (11am-1pm). Dogs dressed in costumes? Sounds like an opportunity to see some interactions between pets and their people (hint, hint).
- Pittsfield Photo Challenge – Accepting entries until November 30th. Prizes.
- More photo opportunities in the next blog. I’ll keep them rolling out as we get closer to the dates…
John,
Just a note of appreciation for all the work, interest, detail and knowledge you pack into your newsletters.
Thank you,
Tom Webster: